Introduction
Microsoft Excel is one of the most widely used tools for storing and organizing scientific, engineering, business, and research data. However, when it comes to advanced graphing, statistical analysis, curve fitting, and scientific visualization, researchers often prefer using OriginPro. Therefore, one of the first skills every OriginPro user should learn is how to import Excel data correctly.
OriginPro provides several methods to import Excel workbooks while preserving data structure, column names, units, and comments. The software can read single-sheet and multi-sheet Excel files and automatically organize them into Origin workbooks and worksheets.
What is Excel Data Import in OriginPro?
Excel Data Import is the process of transferring data stored in Microsoft Excel files (.xlsx or .xls) into OriginPro worksheets for further analysis and visualization.
Once imported, users can:
- Create publication-quality graphs
- Perform statistical analyses
- Conduct curve fitting
- Generate reports
- Process large datasets
- Automate workflows
Importing data correctly ensures accurate analysis and minimizes errors during research.
Why Import Excel Data into OriginPro?
Many researchers collect data in Excel because it is simple and widely available.
However, OriginPro provides additional capabilities:
| Excel | OriginPro |
|---|---|
| Basic Charts | Advanced Scientific Graphs |
| Limited Statistics | Comprehensive Statistical Analysis |
| Basic Regression | Advanced Curve Fitting |
| Limited Visualization | Publication-Quality Graphics |
| General Spreadsheet | Scientific Research Platform |
For this reason, Excel is often used for data collection, while OriginPro is used for analysis and visualization.
Understanding the Import Excel Button
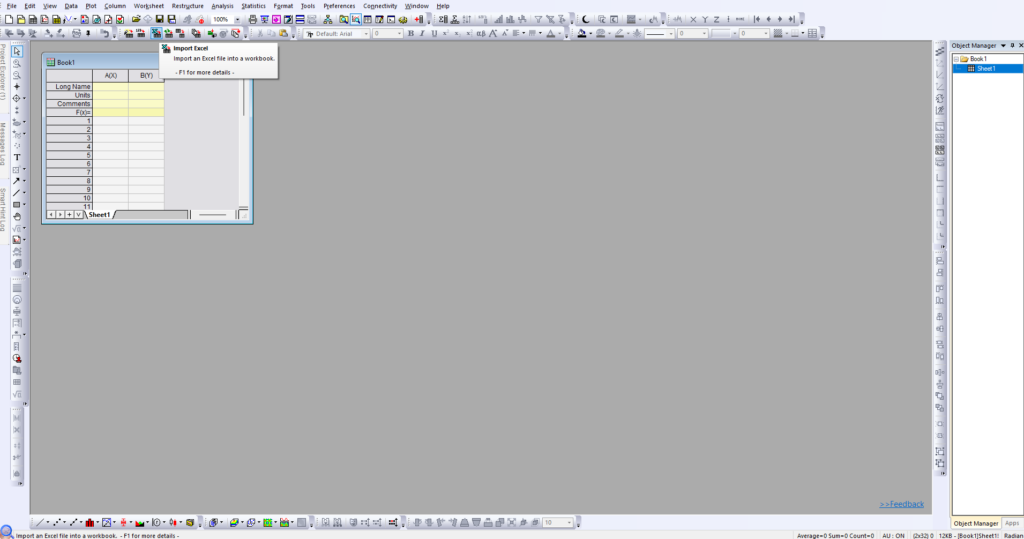
In the first screenshot, the mouse pointer is positioned over the Import Excel button.
Location
Toolbar → Import Excel
When the cursor hovers over the button, OriginPro displays:
Import Excel
Import an Excel file into a workbook.
This button provides the quickest way to import Excel data.
Benefits
✔ Fast import process
✔ Supports multiple worksheets
✔ Automatically creates Origin worksheets
✔ Preserves data structure
✔ Handles large datasets
Preparing Excel Data Before Import
Before importing data, ensure your Excel file is properly organized.
Recommended Structure
| Time | Growth |
|---|---|
| 1 | 2.1 |
| 2 | 3.4 |
| 3 | 5.2 |
| 4 | 7.8 |
| 5 | 9.1 |
Best Practices
- Place column names in the first row.
- Avoid merged cells.
- Remove unnecessary blank rows.
- Keep numerical data consistent.
- Use separate worksheets for different datasets.
Proper formatting improves import accuracy.
Step-by-Step Guide to Import Excel Data
Step 1: Open OriginPro
Launch OriginPro.
A new project opens automatically.
You will see:
- Workbook
- Worksheet
- Toolbars
- Object Manager
similar to the interface shown in the screenshot.
Step 2: Click Import Excel
Locate the Import Excel icon on the toolbar.
Click:
Import Excel
or
Navigate through:
File → Import → Excel
Step 3: Select Excel File
Browse your computer and select:
.xlsx
or
.xls
file.
Example:
PlantGrowthData.xlsx
Click:
Open
Step 4: Excel Import Options Window
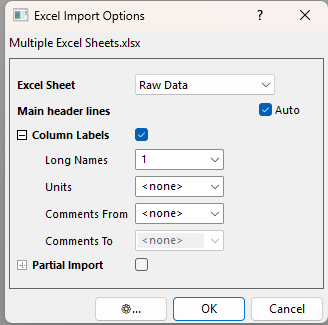
After selecting the file, the dialog box shown in the second screenshot appears.
Excel Import Options
The dialog allows users to customize how Excel data will be imported.
Understanding Excel Import Options
Excel Sheet
The dropdown menu allows selection of a worksheet.
Example:
Raw Data
If your workbook contains multiple sheets, choose the desired sheet.
Example
Experiment.xlsx

├── Raw Data
├── Treatment A
├── Treatment B
└── Summary
Users can import one sheet at a time or multiple sheets.
Auto Option
The Auto checkbox is enabled by default.
Purpose
OriginPro automatically detects:
- Column headers
- Data rows
- Labels
This simplifies the import process for beginners.
Column Labels
The screenshot shows:
Column Labels ✓
enabled.
This option imports descriptive information from Excel.
Long Names
The setting:
Long Names = 1
means the first row will become the column names.
Example:
| Excel Row 1 |
|---|
| Temperature |
| Activity |
After import:
Long Name
Temperature
Activity
appears in OriginPro.
Units
The Units field is currently set to:
<none>
If Excel contains unit information, users can specify which row contains units.
Example:
| Temperature |
| °C |
would become:
Units = °C
inside OriginPro.
Comments
Comments can also be imported.
Researchers often use comments to describe variables or experimental conditions.
Importing Multiple Excel Sheets
OriginPro can automatically import several worksheets.
Example
Excel Workbook:
| Sheet Name |
|---|
| Raw Data |
| Treatment A |
| Treatment B |
| Summary |
After import:
Book1

├── Raw Data
├── Treatment A
├── Treatment B
└── Summary
Each sheet becomes a separate Origin worksheet.
Example: Importing Biological Research Data
Suppose a researcher studies plant growth under three fertilizer treatments.
Excel Dataset
| Treatment | Height |
|---|---|
| A | 15 |
| A | 18 |
| A | 17 |
| B | 22 |
| B | 25 |
| B | 24 |
| C | 30 |
| C | 28 |
| C | 31 |
Saved as:
PlantGrowth.xlsx
Import Process
Step 1
Click Import Excel.
Step 2
Select:
PlantGrowth.xlsx
Step 3
Review Import Options.
Step 4
Click:
OK
Result
OriginPro creates:
Book1
└── Sheet1
containing all imported data.
The data is now ready for:
- Box plots
- ANOVA
- Regression
- Statistical analysis
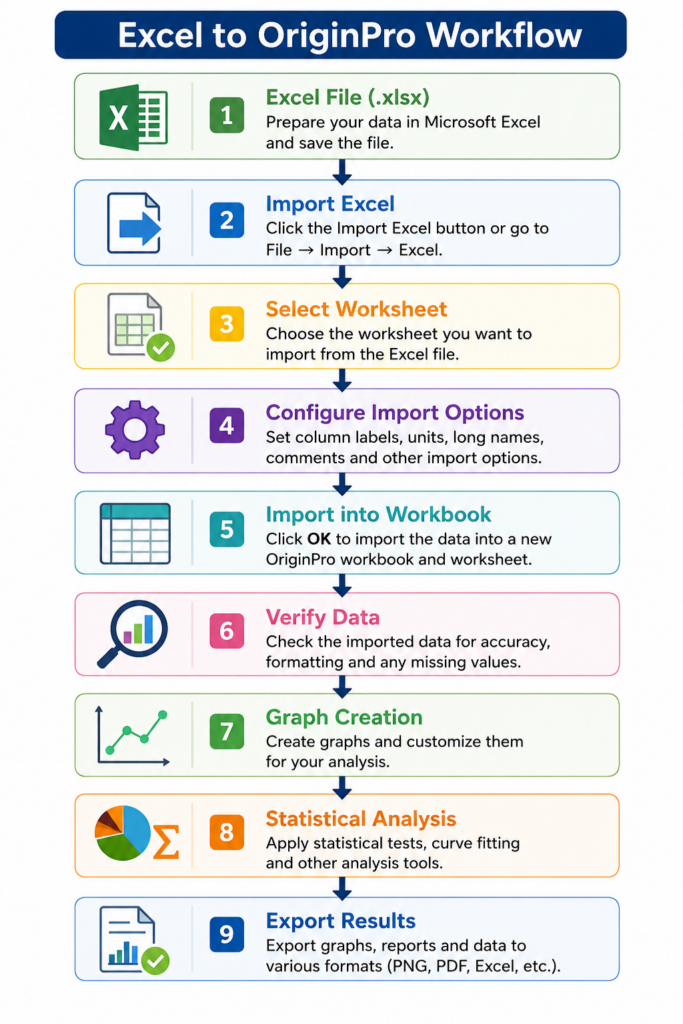
Figure: Excel to OriginPro Workflow
Common Import Problems and Solutions
| Problem | Solution |
|---|---|
| Missing Headers | Enable Column Labels |
| Blank Rows Imported | Clean Excel file before import |
| Units Not Imported | Specify Units row |
| Wrong Sheet Imported | Select correct worksheet |
| Text Appears as Numbers | Check Excel formatting |
| Data Misalignment | Remove merged cells |
Following these recommendations helps avoid import errors.
Tips for Efficient Excel Import
Keep Headers Consistent
Use clear variable names.
Example:
Temperature
pH
Growth
Biomass
Separate Raw and Processed Data
Store each dataset in separate worksheets.
Use Units
Including units improves documentation.
Example:
| Variable | Unit |
|---|---|
| Temperature | °C |
| Weight | g |
| Length | cm |
Check Imported Data
Always verify imported values before analysis.
Save the Project
After importing:
File → Save Project
This preserves all worksheets and future analyses.
Advantages of Importing Excel Data into OriginPro
Faster Workflow
Data moves directly from Excel to analysis.
Better Graphing
Create publication-quality figures.
Advanced Statistics
Access hundreds of statistical methods.
Data Organization
Manage multiple datasets efficiently.
Research Productivity
Reduce manual data entry errors.
Applications of Excel Import in Research
Biological Sciences
- Growth studies
- Gene expression analysis
Environmental Science
- Water quality monitoring
- Climate data analysis
Chemistry
- Instrument-generated datasets
Engineering
- Process optimization
Medical Research
- Clinical trial data
Conclusion
Importing Excel data into OriginPro is one of the most important skills for researchers and students working with scientific datasets. OriginPro provides a simple yet powerful Excel import system that preserves column names, units, comments, and worksheet structures while preparing data for advanced analysis and visualization. Using the Import Excel tool and understanding the available import options ensures that data is transferred accurately and efficiently.
By mastering Excel data import, users can seamlessly move from data collection in Excel to professional graphing, statistical analysis, curve fitting, and report generation in OriginPro. This foundational skill serves as the starting point for all advanced OriginPro workflows and significantly improves research productivity.